Hey guys :) I'm sure many of you have seen and at least attempted eagleeyetom's thread on building a ROM. In the 2nd post, B.Jay helped explain how to set up a VM (Virtual Machine). Now I'm here to explain how to set up a distro and be able to dual-boot into Ubuntu/Linux Mint or Windows.
Why would you want to do so ? Linux is more "Android friendly", compared to Windows especially if you want to compile your own ROMS from source :). Plus, wouldn't you want to try something besides Windows for a change :D ?
Notes : I have tried only Ubuntu 12.04 and Linux Mint 13. From my experiance, it's easier to set up Ubuntu but unless your PC has some serious specs, it won't be a pleasant OS to use ;) I urge many to use Linux Mint over Ubuntu, since it's more forgiving on simple spec PC's.
Requirements
-3. Brain
-2. Presence of mind - to think
-1. Fingers
0. Ability to consider Google as your friend who actualy studies and has vast knowledge
1. A PC :rolleyes:
2. At least a 2GHZ, dual core CPU.
3. At least 2GB's of RAM
4. 80GB of HD space (if you're thinking of getting into serious developing)
As you can see, I'm basing these on my own PC's specs which I find can (barely) cope with dual-booting 2 OS'es (Ubuntu). Remember, these are considered bare minimum, especially when it comes to RAM. If you can, make sure you PC has these or better specs.
Dictionary
Before I begin, I'm gonna make a short dictionary on the simplified terms I'll be using
1. OS = Operating System
2. LMX = Linux Mint
3. UBT = Ubuntu
4. IMG = Image (.iso format)
5. DB = Dual Boot
Ubuntu
This is probably the easiest OS to make DB-able. However, I do not recommend using Ubuntu if you're thinking of serious developing. Use this more like a stepping stone or a test drive in Linux OS'es
1. Download WUBI (Windows Ubuntu Installer) from here.
2. Run the .exe.
3. You should end up with a window or GUI like this
![]()
4. If you know what you're doing, you can configure the settings as you please. If not, just leave them as they are and just fill in your desired username and password.
5. Hit next and leave it to download + install
![]()
6. Finally, you'll end up with a finalization menu like this.
![]()
7. Reboot.
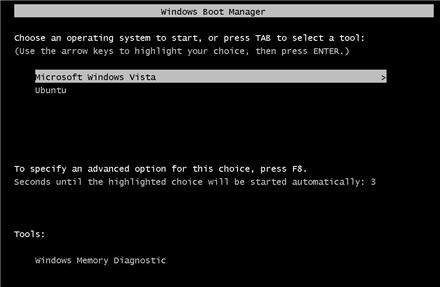
8 You should end up with a menu like this every time you boot your PC.
![]()
9. And you're finished. :) enjoy.
If that was confusing for you, here's a Youtube vid showing how to do it in real time. Thanks, whoever you are in the vid :)
http://www.youtube.com/watch?v=SvOFUoFk_1U
Linux Mint
Now, this one is a bit tricky but you will not regret it :).
1. Pick the flavour of your poison from here . I recommend Cinammon 64-bit version.
2. Download it. Note : It's roughly 890+MB's, so prepare to wait a while :). Note : Make sure you check the iso after it has been downloaded to see if it's exactly the same size as it's written in the website. Sometimes, downloads get interrupted for various reasons and if you're even 1MB short of the actual size, it all fails from this point on.
3. Download IMG Burner (here). It's like a Nero Burner for IMG's.
4. Now, run the IMG Burner and make sure you have an empty DVD to burn the .iso into. Make sure it has enough space to fit the 890+MB .iso. Place the DVD into your tray, run the programme, select the .iso you wish to burn and start burning.
5. After you're done, leave the DVD in the tray and reboot your PC.
6. Now enter BIOS boot mode (press F12 when your PC's brand appears on the screen after rebooting) and select boot from CD/DVD.
7. Let LMX finish installing in your PC and you will soon arrive at your Desktop. On your desktop, you will see three things ; Compter, Home and Installation CD (CD Icon).
8. Click on the Icon and continue your installation.
9. It will soon finish up and then you can enjoy your new OS :)
10. See this video for more detailed info.
http://www.youtube.com/watch?v=IPUX-0j5WCo
Please See
1. When I have time, I will tidy up and improve the instructions, especially the LMX section.
2. Next few posts will explain how to get UBT or LMX more X8 friendly :) (getting flashtool to work on it, etc)
3. Try all of this at you own risk. I won't be held responsible for any damages that occur.
4. This guide is meant to be used with eagleeyetom's Building CM7 guide as well as building from MiniCM sources :)
5. If you have any questions, IMMEDIATELY post it here before proceeding with your problem. Don't post any damages or side effects AFTER you do something w/o asking it here.
Hope this helps someone out there explore the world of Linux :) or to take a break from Windows. Please share if it works for you :D
Why would you want to do so ? Linux is more "Android friendly", compared to Windows especially if you want to compile your own ROMS from source :). Plus, wouldn't you want to try something besides Windows for a change :D ?
Notes : I have tried only Ubuntu 12.04 and Linux Mint 13. From my experiance, it's easier to set up Ubuntu but unless your PC has some serious specs, it won't be a pleasant OS to use ;) I urge many to use Linux Mint over Ubuntu, since it's more forgiving on simple spec PC's.
Requirements
-3. Brain
-2. Presence of mind - to think
-1. Fingers
0. Ability to consider Google as your friend who actualy studies and has vast knowledge
1. A PC :rolleyes:
2. At least a 2GHZ, dual core CPU.
3. At least 2GB's of RAM
4. 80GB of HD space (if you're thinking of getting into serious developing)
As you can see, I'm basing these on my own PC's specs which I find can (barely) cope with dual-booting 2 OS'es (Ubuntu). Remember, these are considered bare minimum, especially when it comes to RAM. If you can, make sure you PC has these or better specs.
Dictionary
Before I begin, I'm gonna make a short dictionary on the simplified terms I'll be using
1. OS = Operating System
2. LMX = Linux Mint
3. UBT = Ubuntu
4. IMG = Image (.iso format)
5. DB = Dual Boot
Ubuntu
This is probably the easiest OS to make DB-able. However, I do not recommend using Ubuntu if you're thinking of serious developing. Use this more like a stepping stone or a test drive in Linux OS'es
1. Download WUBI (Windows Ubuntu Installer) from here.
2. Run the .exe.
3. You should end up with a window or GUI like this

4. If you know what you're doing, you can configure the settings as you please. If not, just leave them as they are and just fill in your desired username and password.
5. Hit next and leave it to download + install

6. Finally, you'll end up with a finalization menu like this.

7. Reboot.
8 You should end up with a menu like this every time you boot your PC.
9. And you're finished. :) enjoy.
If that was confusing for you, here's a Youtube vid showing how to do it in real time. Thanks, whoever you are in the vid :)
http://www.youtube.com/watch?v=SvOFUoFk_1U
Linux Mint
Now, this one is a bit tricky but you will not regret it :).
1. Pick the flavour of your poison from here . I recommend Cinammon 64-bit version.
2. Download it. Note : It's roughly 890+MB's, so prepare to wait a while :). Note : Make sure you check the iso after it has been downloaded to see if it's exactly the same size as it's written in the website. Sometimes, downloads get interrupted for various reasons and if you're even 1MB short of the actual size, it all fails from this point on.
3. Download IMG Burner (here). It's like a Nero Burner for IMG's.
4. Now, run the IMG Burner and make sure you have an empty DVD to burn the .iso into. Make sure it has enough space to fit the 890+MB .iso. Place the DVD into your tray, run the programme, select the .iso you wish to burn and start burning.
5. After you're done, leave the DVD in the tray and reboot your PC.
6. Now enter BIOS boot mode (press F12 when your PC's brand appears on the screen after rebooting) and select boot from CD/DVD.
7. Let LMX finish installing in your PC and you will soon arrive at your Desktop. On your desktop, you will see three things ; Compter, Home and Installation CD (CD Icon).
8. Click on the Icon and continue your installation.
9. It will soon finish up and then you can enjoy your new OS :)
10. See this video for more detailed info.
http://www.youtube.com/watch?v=IPUX-0j5WCo
Please See
1. When I have time, I will tidy up and improve the instructions, especially the LMX section.
2. Next few posts will explain how to get UBT or LMX more X8 friendly :) (getting flashtool to work on it, etc)
3. Try all of this at you own risk. I won't be held responsible for any damages that occur.
4. This guide is meant to be used with eagleeyetom's Building CM7 guide as well as building from MiniCM sources :)
5. If you have any questions, IMMEDIATELY post it here before proceeding with your problem. Don't post any damages or side effects AFTER you do something w/o asking it here.
Hope this helps someone out there explore the world of Linux :) or to take a break from Windows. Please share if it works for you :D